Taskbar Commands
Overview
This sample creates a basic User Interface Extensibility Framework application consisting of one module which adds a new command group to the taskbar and commands to it. It also adds commands to pre-defined command groups in taskbar.
Creating the application structure
Creating the application definition file
Into this folder we will create an application definition file. This file must be named appdef.xml. The application will use version 5 of the client schema (as we are only targeting newer M-Files versions). The application will declare a single Shell UI module (with its code in main.js), and no dashboards.
- XML
<?xml version="1.0"?>
<application xmlns:xsi="http://www.w3.org/2001/XMLSchema-instance" xsi:noNamespaceSchemaLocation="http://www.m-files.com/schemas/appdef-client-v5.xsd">
    <guid>99EEA8CD-B990-4379-AFF9-D9DF2E2147E4</guid>
    <name>TaskBar Commands</name>
    <version>0.1</version>
    <description>A basic application showing how to work with commands in taskbar.</description>
    <publisher>M-Files Corporation</publisher>
    <enabled-by-default>true</enabled-by-default>
    <modules>
        <module environment="shellui">
        <file>main.js</file>
        </module>
    </modules>
</application>
Creating the module
Next we will create a module file to contain our actual application logic. At this point we will just register to be notified of main lifecycle events:
- We will declare a default entry point for the ShellUI module.
- We will react to the NewShellFrame event and obtain a reference to the shell frame.
- We will react to the shell frame’s Started event (as using the shell frame before this point will result in an exception).
- JavaScript
// NOTE! This code is for demonstration purposes only and does not contain any kind of
//       error handling. MUST be revised before using in production.

function OnNewShellUI( shellUI ) {

    /// <summary>Executed by the UIX when a ShellUI module is started.</summary>
    /// <param name="shellUI" type="MFiles.ShellUI">The shell UI object which was created.</param>

    // This is the start point of a ShellUI module.

    // Register to be notified when a new shell frame (MFiles.Event.NewShellFrame) is created.
    shellUI.Events.Register(
        MFiles.Event.NewShellFrame,
        handleNewShellFrame );
}

function handleNewShellFrame( shellFrame ) {

    /// <summary>Handles the OnNewNormalShellFrame event for an IShellUI.</summary>
    /// <param name="shellFrame" type="MFiles.ShellFrame">The shell frame object which was created.</param>

    // The shell frame was created but it cannot be used yet.
    // The following line would throw an exception ("The object cannot be accessed, because it is not ready."):
    // shellFrame.ShowMessage("A shell frame was created");

    // Register to be notified when the shell frame is started.
    shellFrame.Events.Register(
        MFiles.Event.Started,
        getShellFrameStartedHandler( shellFrame ) );
}

function getShellFrameStartedHandler( shellFrame )  {

    /// <summary>Returns a function which handles the OnStarted event for an IShellFrame.</summary>

    // The shell frame is now started and can be used.

    return async () => {};
}
Adding button to a taskbar group
Command buttons are divided into groups on the taskbar.
Adding a button into existing taskbar group involves two steps:
- Creating a new ICommand using CreateCustomCommand.
- Adding the command into the taskbar group using AddCustomCommandToMenu.
Note: The AddCustomCommandToMenu function takes three parameters: the command ID, the MenuLocation, and the order priority.
MenuLocation specifies where the button will be added. If the button is added to a menu location associated with a built-in taskbar group, such as MenuLocation_TaskBar_MainActions, it will appear in the corresponding group on the taskbar (for example, the 'Main actions' group).
Order priority determines the button's position within the group; buttons with lower priority values are shown first.
- JavaScript
// NOTE! This code is for demonstration purposes only and does not contain any kind of
//       error handling. MUST be revised before using in production.

function OnNewShellUI( shellUI ) {

    /// <summary>Executed by the UIX when a ShellUI module is started.</summary>
    /// <param name="shellUI" type="MFiles.ShellUI">The shell UI object which was created.</param>

    // This is the start point of a ShellUI module.

    // Register to be notified when a new shell frame (MFiles.Event.NewShellFrame) is created.
    shellUI.Events.Register(
        MFiles.Event.NewShellFrame,
        handleNewShellFrame );
}

function handleNewShellFrame( shellFrame ) {

    /// <summary>Handles the OnNewNormalShellFrame event for an IShellUI.</summary>
    /// <param name="shellFrame" type="MFiles.ShellFrame">The shell frame object which was created.</param>

    // The shell frame was created but it cannot be used yet.
    // The following line would throw an exception ("The object cannot be accessed, because it is not ready."):
    // shellFrame.ShowMessage("A shell frame was created");

    // Register to be notified when the shell frame is started.
    shellFrame.Events.Register(
        MFiles.Event.Started,
        getShellFrameStartedHandler( shellFrame ) );
}

function getShellFrameStartedHandler( shellFrame )  {

    /// <summary>Returns a function which handles the OnStarted event for an IShellFrame.</summary>

    // The shell frame is now started and can be used.

    return async () => {

        // Create a command (button). Note that it is not yet visible.
        const helloCommandId = await shellFrame.Commands.CreateCustomCommand( "Hello World" );

        // Add the command to the 'Main actions' command group in taskbar.
        await shellFrame.Commands.AddCustomCommandToMenu( helloCommandId, MFiles.MenuLocation.MenuLocation_TaskBar_MainActions, 99 );
    };
}
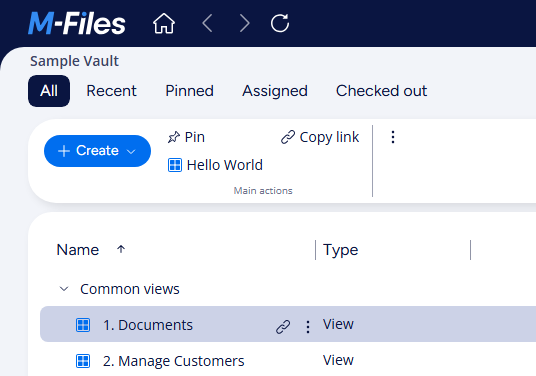
Logging into the M-Files vault should now show a button in the taskbar 'Main actions' group with the text Hello World:

Note that the 'Main actions' group also includes other built-in commands, which may vary depending on the current selection.
Reacting when the command is clicked
Reacting to a command being clicked involves three steps:
- Register to be notified of the CustomCommand event.
- Ensure that the command that was clicked was the one we want to handle.
- Execute the required code.
- JavaScript
// NOTE! This code is for demonstration purposes only and does not contain any kind of
//       error handling. MUST be revised before using in production.

function OnNewShellUI( shellUI ) {

    /// <summary>Executed by the UIX when a ShellUI module is started.</summary>
    /// <param name="shellUI" type="MFiles.ShellUI">The shell UI object which was created.</param>

    // This is the start point of a ShellUI module.

    // Register to be notified when a new shell frame (MFiles.Event.NewShellFrame) is created.
    shellUI.Events.Register(
        MFiles.Event.NewShellFrame,
        handleNewShellFrame );
}

function handleNewShellFrame( shellFrame ) {

    /// <summary>Handles the OnNewNormalShellFrame event for an IShellUI.</summary>
    /// <param name="shellFrame" type="MFiles.ShellFrame">The shell frame object which was created.</param>

    // The shell frame was created but it cannot be used yet.
    // The following line would throw an exception ("The object cannot be accessed, because it is not ready."):
    // shellFrame.ShowMessage("A shell frame was created");

    // Register to be notified when the shell frame is started.
    shellFrame.Events.Register(
        MFiles.Event.Started,
        getShellFrameStartedHandler( shellFrame ) );
}

function getShellFrameStartedHandler( shellFrame )  {

    /// <summary>Returns a function which handles the OnStarted event for an IShellFrame.</summary>

    // The shell frame is now started and can be used.

    return async () => {

        // Create a command (button). Note that it is not yet visible.
        const helloCommandId = await shellFrame.Commands.CreateCustomCommand( "Hello World" );

        // Add the command to the 'Main actions' command group in taskbar.
        await shellFrame.Commands.AddCustomCommandToMenu( helloCommandId, MFiles.MenuLocation.MenuLocation_TaskBar_MainActions, 99 );

        // Register to be notified when a custom command is clicked.
        // Note: this will fire for ALL custom commands, so we need to filter out others.
        shellFrame.Commands.Events.Register(
            MFiles.Event.CustomCommand,
            async ( commandId ) => {

                // Branch depending on the Id of the command that was clicked.
                switch (commandId) {
                    case helloCommandId:

                        // Hello command was clicked.
                        await shellFrame.ShowMessage( "Hello, World!" );
                        break;
                }
            } );

    };
}
Creating a custom taskbar command group and adding commands to it
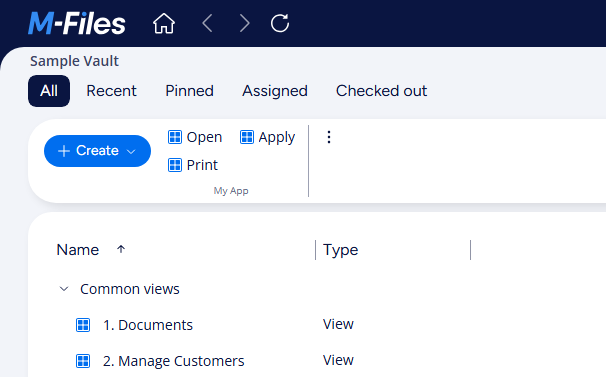
To create a new taskbar command group, call the CreateTaskbarGroup function. It returns a new MenuLocation that can be used in the AddCustomCommandToMenu call. In the example below, a new command group is created in the taskbar, and three commands ("Open", "Apply", and "Print") are added to it.
The CreateTaskbarGroup function takes three parameters: the group name, the group’s location within the taskbar, and the ordering priority.
The group location defines where in the taskbar the new group will appear. For example, it can be the leftmost group (MenuLocation_TaskBar_First),
after the 'Main actions' built-in group (MenuLocation_TaskBar_MainActions), or the rightmost group (MenuLocation_TaskBar_Last).
The ordering priority determines the order of groups within the same taskbar menu location; groups with the smallest priority values appear on the left.
Note that empty command groups are not displayed. You must add commands to the group for it to become visible.
- JavaScript
// NOTE! This code is for demonstration purposes only and does not contain any kind of
//       error handling. MUST be revised before using in production.

function OnNewShellUI( shellUI ) {

    /// <summary>Executed by the UIX when a ShellUI module is started.</summary>
    /// <param name="shellUI" type="MFiles.ShellUI">The shell UI object which was created.</param>

    // This is the start point of a ShellUI module.

    // Register to be notified when a new shell frame (MFiles.Event.NewShellFrame) is created.
    shellUI.Events.Register(
        MFiles.Event.NewShellFrame,
        handleNewShellFrame );
}

function handleNewShellFrame( shellFrame ) {

    /// <summary>Handles the OnNewNormalShellFrame event for an IShellUI.</summary>
    /// <param name="shellFrame" type="MFiles.ShellFrame">The shell frame object which was created.</param>

    // The shell frame was created but it cannot be used yet.
    // The following line would throw an exception ("The object cannot be accessed, because it is not ready."):
    // shellFrame.ShowMessage("A shell frame was created");

    // Register to be notified when the shell frame is started.
    shellFrame.Events.Register(
        MFiles.Event.Started,
        getShellFrameStartedHandler( shellFrame ) );
}

function getShellFrameStartedHandler( shellFrame )  {

    /// <summary>Returns a function which handles the OnStarted event for an IShellFrame.</summary>

    // The shell frame is now started and can be used.

    return async () => {

        // Create a command group in taskbar. Note that it is not yet visible.
        const myGroupId = await shellFrame.Commands.CreateTaskbarGroup( "My App", MFiles.MenuLocation.MenuLocation_TaskBar_Last, 1 );

        // Create commands to be added to the taskbar command group.
        const openCmdId = await shellFrame.Commands.CreateCustomCommand( "Open" );
        const applyCmdId = await shellFrame.Commands.CreateCustomCommand( "Apply" );
        const printCmdId = await shellFrame.Commands.CreateCustomCommand( "Print" );

        // Add the commands to the custom command group. Commands are displayed in priority order.
        await shellFrame.Commands.AddCustomCommandToMenu( openCmdId, myGroupId, 1 );
        await shellFrame.Commands.AddCustomCommandToMenu( applyCmdId, myGroupId, 2 );
        await shellFrame.Commands.AddCustomCommandToMenu( printCmdId, myGroupId, 3 );

        // Register to be notified when a custom command is clicked.
        // Note: this will fire for ALL custom commands, so we need to filter out others.
        shellFrame.Commands.Events.Register(
            MFiles.Event.CustomCommand,
            async ( commandId ) => {

                // Branch depending on the Id of the command that was clicked.
                switch (commandId) {
                    case openCmdId:

                        // Open command was clicked.
                        await shellFrame.ShowMessage( "Open command" );
                        break;

                    case applyCmdId:

                        // Apply command was clicked.
                        await shellFrame.ShowMessage( "Apply command" );
                        break;

                    case printCmdId:

                        // Print command was clicked.
                        await shellFrame.ShowMessage( "Print command" );
                        break;
                }
            } );

    };
}
Logging into the M-Files vault should now show a My App command group in taskbar and the three commands in it:

Creating a submenu in the taskbar and adding commands to it
Taskbar commands can be organized into submenus. A submenu can contain menu items (i.e. commands) as well as other, more deeply nested submenus.
Creating a menu item that opens a submenu involves several steps:
- Create a new ICommand using CreateCustomCommand.
- Add the command to the taskbar group using AddCustomCommandToMenu.
- For each submenu command:
- Create a new ICommand using CreateCustomCommand.
- Create a new submenu item for the command using CreateSubMenuItem.
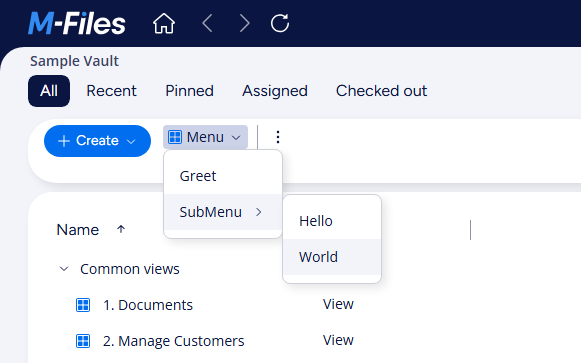
Example code below creates a taskbar group called "My App", and adds a menu item "Menu" to it. This menu item opens a submenu containing one command "Greet" and a nested submenu "SubMenu". The nested submenu includes two commands: "Hello" and "World".
- JavaScript
// NOTE! This code is for demonstration purposes only and does not contain any kind of
//       error handling. MUST be revised before using in production.

function OnNewShellUI(shellUI) {

    /// <summary>Executed by the UIX when a ShellUI module is started.</summary>
    /// <param name="shellUI" type="MFiles.ShellUI">The shell UI object which was created.</param>

    // This is the start point of a ShellUI module.

    // Register to be notified when a new shell frame (MFiles.Event.NewShellFrame) is created.
    shellUI.Events.Register(
        MFiles.Event.NewShellFrame,
        handleNewShellFrame);
}

function handleNewShellFrame(shellFrame) {

    /// <summary>Handles the OnNewNormalShellFrame event for an IShellUI.</summary>
    /// <param name="shellFrame" type="MFiles.ShellFrame">The shell frame object which was created.</param>

    // The shell frame was created but it cannot be used yet.
    // The following line would throw an exception ("The object cannot be accessed, because it is not ready."):
    // shellFrame.ShowMessage("A shell frame was created");

    // Register to be notified when the shell frame is started.
    shellFrame.Events.Register(
        MFiles.Event.Started,
        getShellFrameStartedHandler(shellFrame));
}

function getShellFrameStartedHandler(shellFrame) {

    /// <summary>Returns a function which handles the OnStarted event for an IShellFrame.</summary>

    // The shell frame is now started and can be used.

    return async () => {

        // Create a command group in taskbar. Note that it is not yet visible.
        const myGroupId = await shellFrame.Commands.CreateTaskbarGroup("My App", MFiles.MenuLocation.MenuLocation_TaskBar_Last, 1);

        // Create a custom command to be added to the taskbar command group.
        // It contains menu when submenu items are added into it.
        const mainMenuCmd = await shellFrame.Commands.CreateCustomCommand("Menu");
        const mainMenuId = await shellFrame.Commands.AddCustomCommandToMenu(mainMenuCmd, myGroupId, 1);

        // Create "Greet" command and add it to the main menu.
        const commandGreetId = await shellFrame.Commands.CreateCustomCommand("Greet");
        const commandGreetMenuId = await shellFrame.Commands.CreateSubMenuItem(mainMenuId, commandGreetId, 1);

        // Create "SubMenu" command and add it to the main menu.
        const subMenuCmd = await shellFrame.Commands.CreateCustomCommand("SubMenu");
        const subMenuId = await shellFrame.Commands.CreateSubMenuItem(mainMenuId, subMenuCmd, 2);

        // Create "Hello" command and add it to the nested menu.
        const helloCommandId = await shellFrame.Commands.CreateCustomCommand("Hello");
        const helloMenuId = await shellFrame.Commands.CreateSubMenuItem(subMenuId, helloCommandId, 1);

        // Create "World" command and add it to the nested menu.
        const worldCommandId = await shellFrame.Commands.CreateCustomCommand("World");
        const worldMenuId = await shellFrame.Commands.CreateSubMenuItem(subMenuId, worldCommandId, 2);

        // Register to be notified when a custom command is clicked.
        // Note: this will fire for ALL custom commands, so we need to filter out others.
        shellFrame.Commands.Events.Register(
            MFiles.Event.CustomCommand,
            async (commandId) => {

                // Branch depending on the Id of the command that was clicked.
                switch (commandId) {
                    case commandGreetId:

                        // Greet command was clicked.
                        await shellFrame.ShowMessage("Hello, World!");
                        break;

                    case helloCommandId:

                        // Hello command was clicked.
                        await shellFrame.ShowMessage("Hello");
                        break;

                    case worldCommandId:

                        // World command was clicked.
                        await shellFrame.ShowMessage("World");
                        break;
                }
            });
    };
}
Logging into the M-Files vault should now show a My App command group in taskbar and the commands with submenus in it:

Hiding and displaying commands in taskbar
The command can be hidden from the taskbar using the SetCommandState function.
SetCommandState function takes three parameters:
- The command id.
- The command location (i.e. where the command state should be changed).
- The new command state.
To hide or show commands in the taskbar, use the CommandLocation.TaskBar command location.
Use the following command states:
- CommandState_Active to show the command.
- CommandState_Hidden to hide the command.
// Example: show or hide the command with commandId in taskbar.
const newState = isCommandAvailable ? CommandState.CommandState_Active : CommandState.CommandState_Hidden;
await shellFrame.Commands.SetCommandState( commandId, MFiles.CommandLocation.TaskBar, newState );
When a new command is created and added to the taskbar, its command state is CommandState_Active by default.
Adding an icon
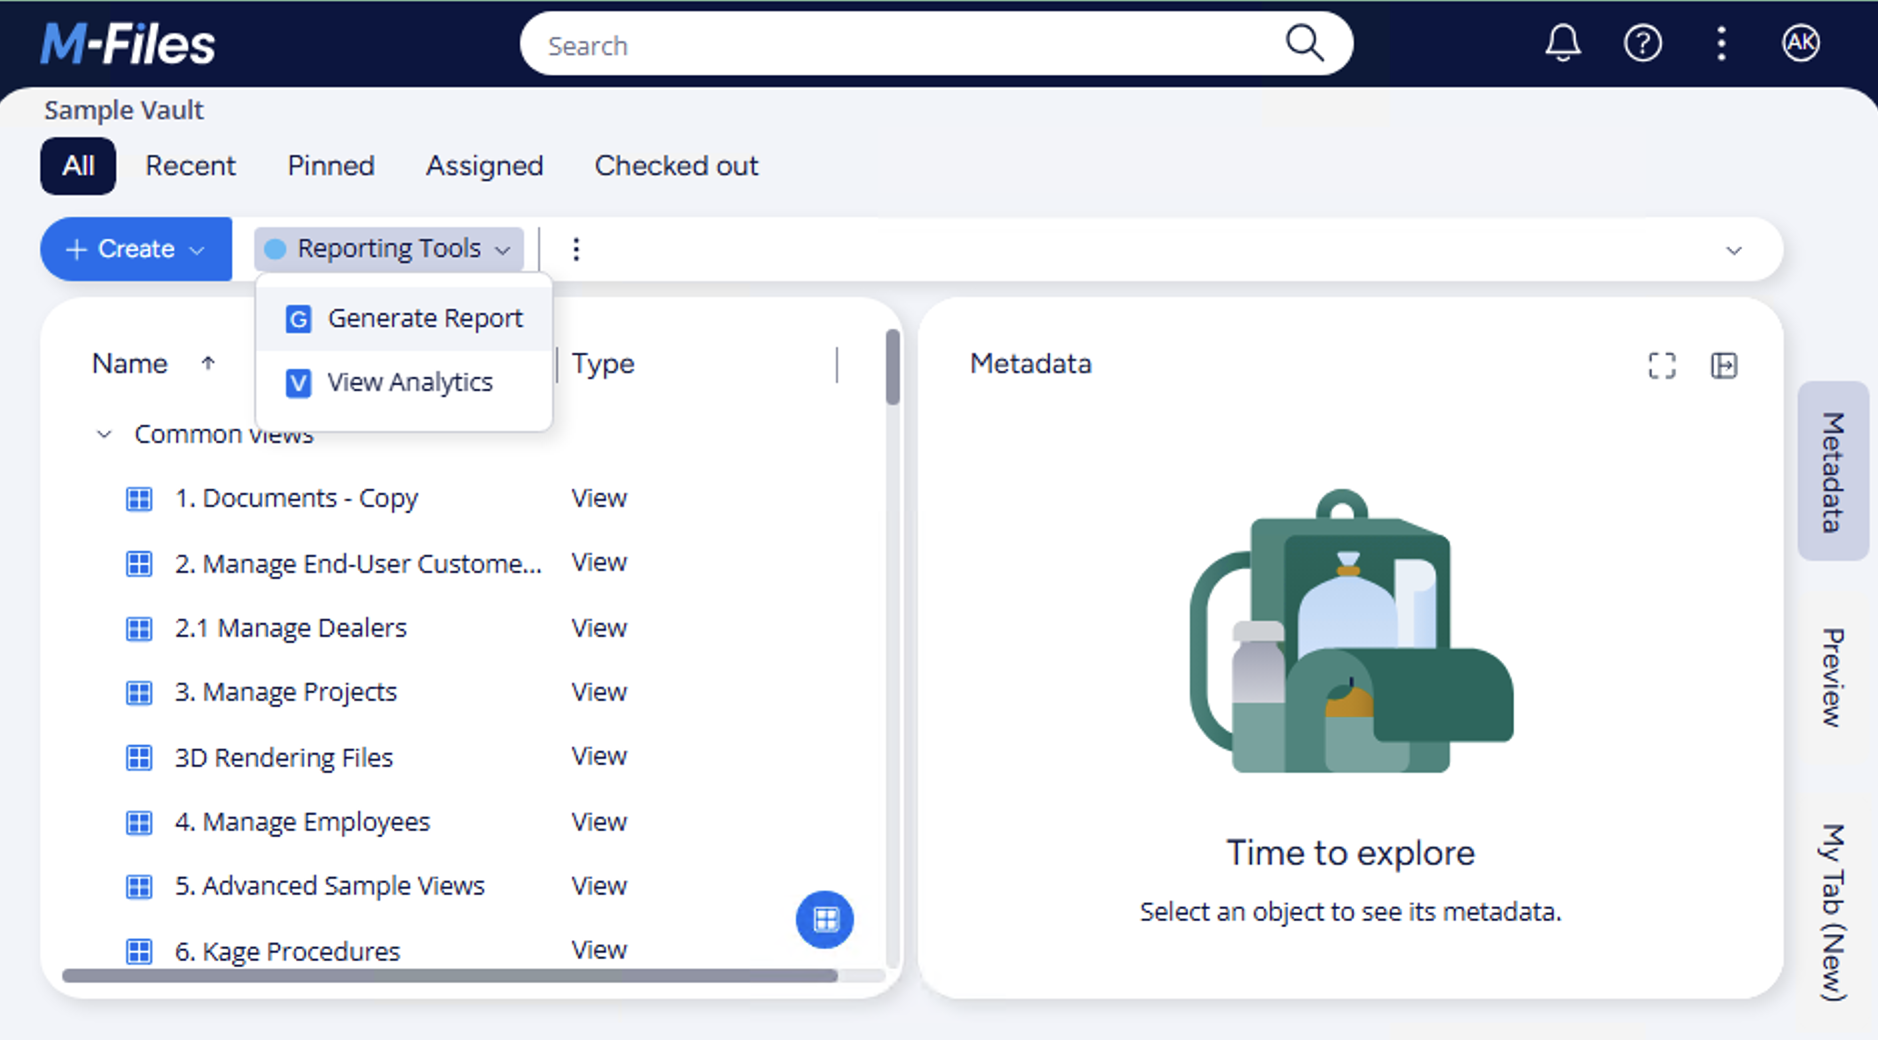
To set an icon for an existing custom taskbar group, call SetTaskbarGroupIcon(groupId, iconInformation) to update the icon shown for a taskbar group created by your application. The function verifies feature availability and ownership, resolves the icon using the same helpers as SetIcon, applies the icon to the group, and refreshes the taskbar so the new icon is visible.
Parameters
groupId(number) – id of the taskbar group to update. The group must be created by your app and owned by its Application GUID.iconInformation(IIconInformation) – description of the icon (inline SVG, base64, path, built-in id, etc.).
How it works
- Validates inputs; throws on null/undefined parameters.
- Reads the application GUID and verifies ownership; throws if the group is missing or not owned by the app.
- Resolves the icon and sets
group.icon. - Refreshes taskbar commands, so the UI updates.
Key notes
- Signature:
async SetTaskbarGroupIcon(groupId: number, iconInformation: IIconInformation): Promise<void> - Stability: Experimental — API may change.
- Ownership required: the call uses the application GUID; you must own the taskbar group to modify it.
- Icon resolution: same rules as
SetIcon(inline SVG default extensionsvg, PATH requires fetch/CORS, built-in ids map to icon helpers). - Errors: throws when parameters are missing, when appGUID is not available, or when the group does not exist / ownership verification fails. If
getIconthrows, the error is wrapped and re-thrown with a failure message.
// Base64-encoded SVG icon for the group
const groupIconBase64 = 'PHN2ZyB3aWR0aD0iMTYiIGhlaWdodD0iMTYiIHZpZXdCb3g9IjAgMCAxNiAxNiIgZmlsbD0ibm9uZSIgeG1sbnM9Imh0dHA6Ly93d3cudzMub3JnLzIwMDAvc3ZnIj4KPHBhdGggZD0iTTggMTRBNiA2IDAgMSAwIDggMmE2IDYgMCAwIDAgMCAxMloiIGZpbGw9IiM0RkJBRjciLz4KUGF0aCBkPSJtNS45MyA4LjM4IDEuMDYgMS4wNmEuNzUuNzUgMCAwIDAgMS4wNiAwbDMuOC0zLjhhLjc1Ljc1IDAgMCAwLTEuMDYtMS4wNkw4IDcuMzJsLS43OS0uNzlhLjc1Ljc1IDAgMCAwLTEuMDYgMS4wNmwtLjIyLjIxeiIgZmlsbD0iI2ZmZiIvPgo8L3N2Zz4=';
function OnNewShellUI(shellUI) {
  shellUI.Events.Register(MFiles.Event.NewShellFrame, handleNewShellFrame);
}

function handleNewShellFrame(shellFrame) {
  shellFrame.Events.Register(MFiles.Event.Started, getShellFrameStartedHandler(shellFrame));
}

function getShellFrameStartedHandler(shellFrame) {
    return async () => {
    // Create a taskbar group with icon
    const reportingGroup = await shellFrame.Commands.CreateTaskbarGroup(
        "Reporting Tools",
        MFiles.MenuLocation.MenuLocation_TaskBar_MainActions,
        1
    );

    // Create commands for the group
    const generateReportCommand = await shellFrame.Commands.CreateCustomCommand("Generate Report");
    const viewAnalyticsCommand = await shellFrame.Commands.CreateCustomCommand("View Analytics");

    // Add commands to the group
    await shellFrame.Commands.AddCustomCommandToMenu(generateReportCommand, reportingGroup, 1);
    await shellFrame.Commands.AddCustomCommandToMenu(viewAnalyticsCommand, reportingGroup, 2);

    // Set icon for the group
    const groupIconInfo = {
        content: groupIconBase64,
        iconContentType: "BASE64",
        alt: "Reporting tools group icon",
        extension: "svg"
    };

    await shellFrame.Commands.SetTaskbarGroupIcon(reportingGroup, groupIconInfo);
  };
}
